Shall I say that DX7s need no introduction? Well there are more web pages than I’d try to count about them, so if you need an introduction, go get it.
The original DX7 to me was that sleek thing with membrane keys which, in 1984, someone I knew got hold of, praised the capabilities of effusively, and left me with unattended for a few minutes. Being sort of used to simple analogue synths, I thought, well, let’s see? And pressed a few membranes, managing to change what it was doing out of all recognition in a few short seconds, with no idea how to change it back. Up DX7 creek without a manual, nor any clue how I got there. I thought it would be best to just leave it rather than make things worse. Leave it at speed, before its owner returned. I never saw it again.
Clearly this memory has stayed with me. In fact it’s probably the exact reason why I prefer proper synthesisers, i.e. ones with a control for each parameter, that you can see, adjust, and then put back where you found it. Nevertheless, I’ve always thought that one day I would like to find out how to use the thing. One of my own, without the risk of wrecking someone else’s setup again.
So, here we have one of the DX7 updates, a DX7S, from 1987 I think, and in need of some attention. I’m not sure what’s wrong with it, but battery replacement is apparently wanted. Hopefully not much more than that.
This DX7S
Well, in practice it needs a clean, that much is obvious. Cosmetically it isn’t bad, though it has a few scratches on the end and underside. Its power plug has a bent pin, so replacing that. And its pitch modwheel is disturbingly wobbly; perhaps something broke? It has been recently used, so powering up . . . It wants the battery changed, as expected. It does nothing audible except making switch-on/off blips and a small amount of hiss from the headphone amp when turned up — which may not be there on the line output; we’ll see. No surprises, as it’s probably lost all its voice data.
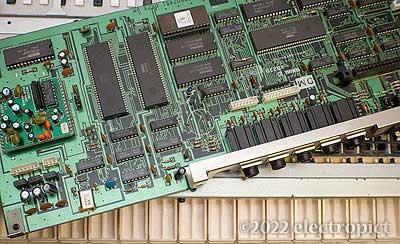
To get it open, the service manual instructs us to remove fourteen screws on the underside, but ten of them are missing, so I’m not the first intruder. Interestingly, here in this late-80s digital synth, the internal wiring still uses lacing cord rather than ribbon cables for everything. The lower panel is quite dusty inside and needs a clean. There should also be some screws holding the “DM” main board on the back panel but they’ve gone too, as has one of the internal screws.
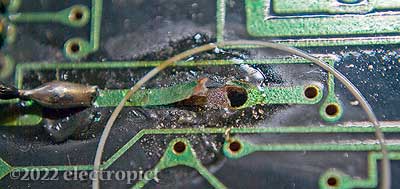
The battery has previously been replaced, rather poorly, with the original negative battery leg having taken some PCB trace with it when it was pulled, and a bodge wire to further up the trace. It was soldered in and I suspect the heat may have damaged the battery; at any rate it has a little crystalline growth on it. Cut and dumped.
The pitch wheel looks as though it’s just loose rather than broken; there’s a nut which can be tightened if I can get at it. Might need a thin spanner, but that whole panel will need disassembling for cleaning anyhow. Even with the lower panel cleaned there’s quite a smell. Whole thing to be disassembled and sanitised.
Turning on again, there’s no difference. Tapping buttons leaves me with little more clue about what’s happening than I had thirty-eight years ago, but I suspect that it needs data restored from a cartridge or via MIDI. I have no cartridge, and people want silly money for them, but the default data is apparently available for download, though it won’t store without a battery.
The “31” button doesn’t seem to be working. Maybe it’ll clean . . . In fact they should all be cleaned. So new battery holder ordered.
Some days later, I’ve managed to lay hands on a ROM cartridge at a bit under the usual price; still pretty expensive though. (A new much-expanded third-party cartridge “HCard 702” has been manufactured, but they’re out of stock everywhere and it’s unclear when or if they’ll be made again.) With the cartridge in place and with a bit of guidance from Alex Annesty rather than the manual, I’ve managed to get it to play the default sounds. And with of a bit of persuasion button 31 is now working sometimes, but it also becomes apparent that some of the other buttons are slightly intermittent. Other than that it seems to be working save for the battery.
Cleaning and Repair
The keybed can be removed by undoing a few screws and cutting a couple of zip ties to clear the cables. The keys come off very easily once the retaining strip along the rear is removed. The keys contain a metal strip as a return spring, and a metal weight which doesn’t seem removable; and they’re greased at two points. So cleaning them (and these really do need it) is best done by wiping. Unusually (or it might be more common in modern keyboards, don’t know), instead of having evenly spaced keys and eight natural key types, this has uneven spacing and six key designs (C+F, D, E+B, G, A, top C). Reinsertion seems fairly easy, though a bit delicate. So, all good? No. See below . . .
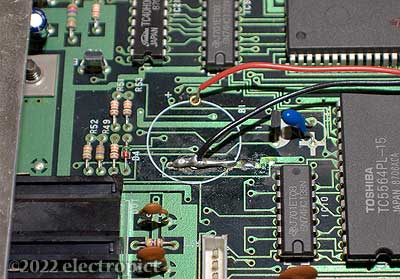
Back to the battery. The wire in the positive terminal hole wasn’t original, and it turns out there was some trace damage here too, and it had been soldered back to a nearby pad on the solder side. After a couple of failed attempts with copper foil (failure, during soldering, of the epoxy I used to stick the foil down), I’ve put rivets in the holes and soldered a wire loop across the break on the ground side. The wires for the new battery holder are soldered into the rivets, and the positive wire through the rivet and soldered onto that pad on the reverse. The battery holder will be mounted beside the DM board so it doesn’t need to be removed again just for a battery change. (The CR2032 batteries I expect to use will last a while but maybe not as long as the originals; but they should have been accessible and replaceable from the start.)
The contacts on the switch boards are easily accessed once you get the board out. There are three sets of buttons, each in an assembly for which there is probably a technical term, but I don’t know it. (Suggestions welcome.) The service manual does list them but just calls them Knob C, D, and E. So presumably Yamaha in the 1980s didn’t have a technical term either.
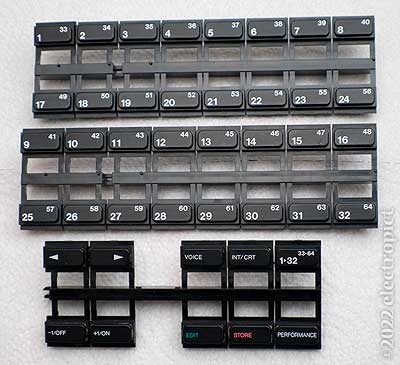
They were thick with dirt, but scrubbed up well. I believe you can disassemble the contact switches but I’ve never done it and would prefer to avoid, so I’m just running some contact cleaner through them as far as possible. We’ll see.
The modwheels unscrew and come out quite easily, and with the wheel off the pitch wheel nut is immediately accessible for tightening. The wheels unfortunately have very fine deep grooves, which makes cleaning a bit of a pain. Most brushes aren’t fine enough, so I’m using fingernails. The same applies to the slider caps. The end panels also need a clean, but while they’re complex, they unscrew and separate without any trouble. As at the time of writing I’m not quite confident of remembering where all the screws go in reassembly, but it should be doable. There is a comprehensive parts diagram in the service manual, but I’m not sure all the screws I’ve taken out were in their original locations, and some of the threads, particularly on the bottom cover, may have been damaged.
That leaves the top panel. This is an aluminium extrusion, and is also fairly encrusted, but cleans off easily enough with a soaked tissue and a fingernail.
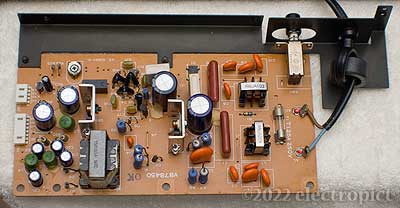
The PSU electrolytic capacitors need checking, and and far as I can see without desoldering, they’re in excellent condition. Some of the readings are what you’d get from two of them in parallel, but no surprises there.
Minor Disaster Avoided
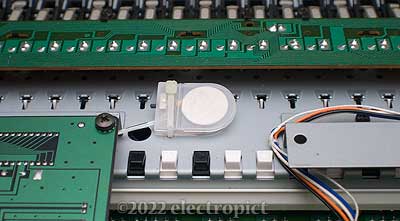
The keyboard. Of course, once I’d got all the keys back in I put it aside to work on the other parts. And then started to reassemble. With the keybed upside down and about to bolt it back in I realised that at some point during reinsertion, several of the contact strips had been bent out of shape by the keys. There is no obvious indication when removing them that this would be a problem, and as I write I’m still not sure exactly what happened, but it is clearly necessary to remove the contacts board from the underside of the keybed before reinserting keys. Presumably that applies to other synths of the era too.
The contacts board is attached with fifteen machine screws; which is a bit of a pain, but its removal does make key insertion noticeably easier. (As became apparent when I accidentally popped a couple of keys off again, lost one of the metal spring strips inside and had to take about half a dozen out to find it.)
Fortunately, the contact strips can be bent back into shape without damage, but that might not work a second time. Hopefully that’s sorted it?

Not quite. C3 notes have quite low volume, as if maybe the velocity-sensing contact needs to be bent a bit further into place; so opening up again . . . yes, one of the contacts was hovering about ½mm away from where it should have been. Fixed. This is now fine.
Memory Holes
Nearly done. There are some holes in the keybed beside the DM board which are just about right for tying the battery holder into.
All that done, does it work?
Powers up fine, with the battery warning, but once the cartridge is loaded, it retains the memory after a few minutes off. But it still shows the battery warning anyway, so that may not be reliable. With some perusal of the circuit diagram I’ve concluded that the solder pads on the reverse of the board, to one of which I soldered the positive wire, must have originally been joined somehow.
(Along the way I notice that the diagram has an error — the battery power is given as going to pins 28 on IC4 and IC23 but it’s actually IC4 and IC32, the two TC5564PL-15 SRAM chips. And, though this is probably an update rather than an error, the battery also has a connection beside the FC2 switch (IC24) — this trace could be where it gets its startup check — and R21 there is 2M2 on the diagram but 2M7 on the board.)
I tried again with a piece of conductive copper foil joining the two pads . . . which makes no real difference. The voltage at the chips is dubious; maybe +0·02V. A search online shows that Alex Annesty has been here before me, and has a page about battery replacement, including a picture of the rear of an undamaged board, in which there seems to be a large blob of solder joining the two pads. So I’m trying that.
I get a little more voltage at the chips’ pins 28, but still nothing like the 3·29V of the new battery across the wire inputs. It’s passing through a diode and resistor to get here, of course. Does it work? No — in the morning, all the voice data’s gone again. So I’m beginning to trust that battery warning.
The TC5564PL datasheet indicates that the data maintenance voltage should be +2·0–5·5V, significantly higher than this is getting. Are the resistor and diode in tolerance? Yes.
At this point I naturally began to faff about, and, long story short, wasted another half a day before realising that the battery holder I used had negatives all the way down one of its wires, which I thought I had checked, so had connected to ground, with the other to the positive hole. But this was wrong. So I resoldered the joints to my extension wires, supplying positive power where wanted, from the negative-marked wire. And that works. <bitey emoticon placeholder>
Finishing Up
The buttons all seem to work, most of the time at least. I might open it up again one day and run a little more contact cleaner through one or two of them if it doesn’t settle.
Last thing is the mains power. The service manual doesn’t say anything about power calibration, and there doesn’t seem to be any adjustment for the ±12V, but they’re a bit out at c.12·1 and 11·9. Something to keep an eye on perhaps. Other than that everything is pretty good.

Conclusions
Overall, battery and key contacts (completely avoidable situations) aside, this is one of the easier keyboard refurbishments I’ve done; almost to the point of tedium. (Wiping 61 keys by hand.) Its propensity to acquire dust and grime and keep it out of reach of a duster is above average, so I may invest in a case.
Like many others over the last thirty-something years I’m finding that some of the presets are interesting, and I guess they’re no longer as universal as they were in the late 80s, so they may not be too tedious to use. But also that many of them are a bit uncanny-valley, pretending to be real instruments but not quite managing (which is the other reason I prefer simple analogue synths). And, at least when just running it into headphones, the amplitude peaks are a bit . . . naïvely strong? Serious need of compression. Programming it is still a bit like an 1984 home-computer maze game . . . I’m stuck at the start and worried about lurking grues. Results may be posted in the form of audio one day.
Comment or Question about this page? write
Article text ©2022 Electropict  .
.
Click images for individual licences.
