I
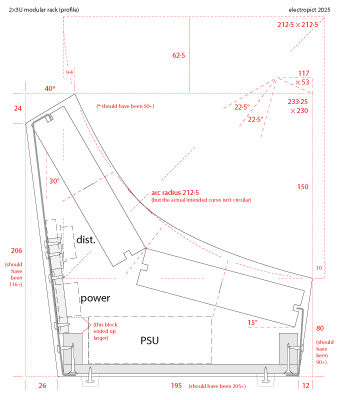
I want this case to be as compact as possible, though I don’t really know quite how this is going to fit together. I’m thinking it should be possible to fold the aluminium sheet so that it clips into the middle screw groove in the top and bottom extrusions of the (captive-nut) racks, thus avoiding any exposed metal edges. If it works, it should also be possible to fold a front and back plate over a base and then hold them in with a small number of screws.
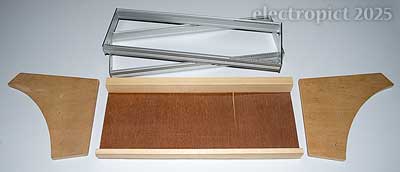
I cut the ends out of plywood with mostly a handsaw, but using an electric jigsaw for the curve (which I drew freehand on the wood since it wasn’t trying to be circular anyway). The curve didn’t quite work out thanks to problems with the saw and clamps, but some work with a flap sander improved things. [2] The racks have countersunk ⌀3·5mm holes at either end, presumably on the basis that minimising protrusion is good. I had to buy some bolts, but couldn’t get 3·5mm so I’ve drilled the holes out to 4mm. Washers and Nylock nuts on the outside.
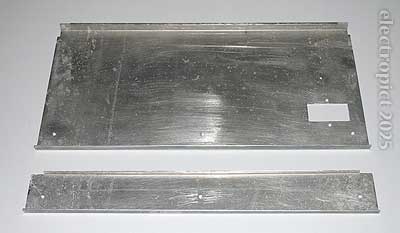
At this point things are a bit rough; the plywood could use a little filler but the aluminium can just be sanded and primed. Both will be painted. Black, because, black.
I’m also intending to line the wooden parts with aluminium foil. I wasn’t entirely sure but eventually decided to go with a thinner plywood scrap for the base. The front and rear support strips are another offcut of something, cut longitudinally. In practice the plywood I had for the base turned out to be a bit curved so I used a larger offcut for the rear support strip to help straighten it. The ends screw into these, making the assembly quite solid already.
I didn’t measure the aluminium panels but marked fold lines on them as I went. They’re not perfectly straight (or perhaps the construction isn’t) but it works quite well, with little cutouts to avoid the corner of the frame on the rear panel, and the rack-end screws on both. Only minimal blood loss was involved. I did have to do the final fold in (to lock into the rack groove) on the rear panel with a steel strip and a hammer, which isn’t what I intended as I don’t want the hammered effect, but it came out quite smoothly. I assembled the thing experimentally at this point, and found the rear plate was exerting enough pressure on the top extrusion that it was pulling it back a little, making screwing the modules in a little tight. I filed the edge straighter and unbent it a little, which seemed to fix it.
The rear panel also has to take the power socket, and I wasn’t sure what the best approach to this was; I think over time the aluminium would dent a bit if there weren’t any additional support, and probably pull the screws loose, so I’m adding a thin plywood plate and gluing and bolting it on. Also a support block in the middle on either side. Possibly this is overkill. But possibly Overkill is my heavy metal spirit name.
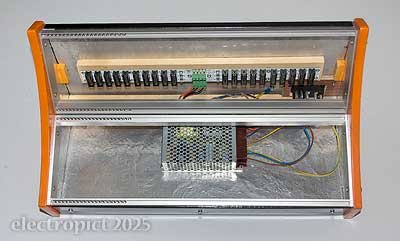
The PSU doesn’t quite fit in as designed because of the thicker wood block, but as long as I don’t put deep modules in the wrong place it should work. In retrospect it would have been a good idea to make the whole thing a centimetre taller and deeper; maybe more. The PSU is the Meanwell RT65B, and I noticed when it arrived that its mains terminals are exposed, which isn’t ideal even inside a case, especially one with so little space as this. But it turns out I’m not the first to have spotted this problem. A bespoke insulating cover for it is available though not cheap. (Later: The price came down a few months after I wrote this so I got one.) The power+fuse socket supplied also has exposed terminals; not that that’s unusual.
The hole I mentioned ended up in the wrong place because I preferred to paint the other side. But it’ll do for an earthing lug. I forgot to do so before priming, but I went back and drilled holes for the power socket support and distribution board before doing the topcoat.
Then, remember I said black, because black? Well the ends worked out orange because I didn’t have any black that was likely to work with the undercoat, but I did have the last of a tin of orange. So, orange, because, black.
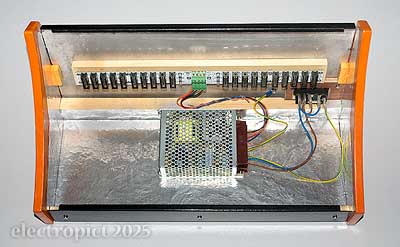
here the PSU terminals are still covered with insulating tape; waiting for the bespoke cover
Attach distribution board and PSU and wire them, with an earth wire to the rear panel, and screw on some rubber feet. I’ll make some blanking plates from the remaining aluminium later.
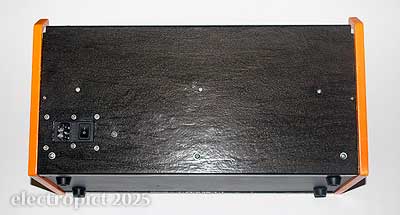
the side screws aren’t in yet in this picture
In other retrospect, the panels’ clip-in edges didn’t need to be cut quite so far back for the rack screws; it would have been possible to do this so that it visibly continued to the edges. And with it in use I conclude that the angle between the racks of 135° is a bit steep, or it could do with a bit of space between them. Maybe aim for 157·5° next time. But that wouldn’t be as compact, would it?
Total new cost, about £1 for the screws and nuts, plus a tin of paint. Wire and other undercoats I had already, and the rest was scrap. PSU and distribution was about £150. [3] The frames were about £80. I’d expect to pay a bit more for something ready-made. But since it took time I could have used for other things, I’m not sure it’s worth it. And since I’m already halfway to filling this, chances are a future one would be less compact, and I have a little less scrap available than I once had. However, the price differential for something bigger might also be greater.
Comment or Question about this page? write
Notes
- I think it might have been used in the 1970s as a heat shield on a cabinet beside a gas stove, but memory is dim. ↖
- Case for a bandsaw. Case for money for a bandsaw. Case for workshop space for bandsaw. Case for money for workshop space. Ah well. ↖
- Another cost reduction would have been be using a cheaper PSU with an external adaptor, power module, and ribbon cables rather than a distribution board. But that means an external block and taking up 4HPs of rack. But realistically this PSU would do three of these cases. Perhaps I should add a power-out socket for future expansion. ↖
Article text ©2025 Electropict  .
.
Click images for individual licences.